
How to use F110 – Automatic Payment Transaction?
Basically, there are 2 types of payment in SAP which are manual payment (F-53, F-58) and automatic payment (F110). For manual payment, you can choose many invoices in one time for posting an outgoing payment. But please notice that system can generate only 1 payment document. On the other hand, system allows you to do outgoing payment in mass via F110.
Before using F110 – Automatic Payment Transaction, you have to complete automatic payment configuration (Click Here – How to configure automatic payment).
1. Enter Parameter
This is the first step that you have to do. SAP selects open invoice(s) based on parameter in F110.
Tab Parameter

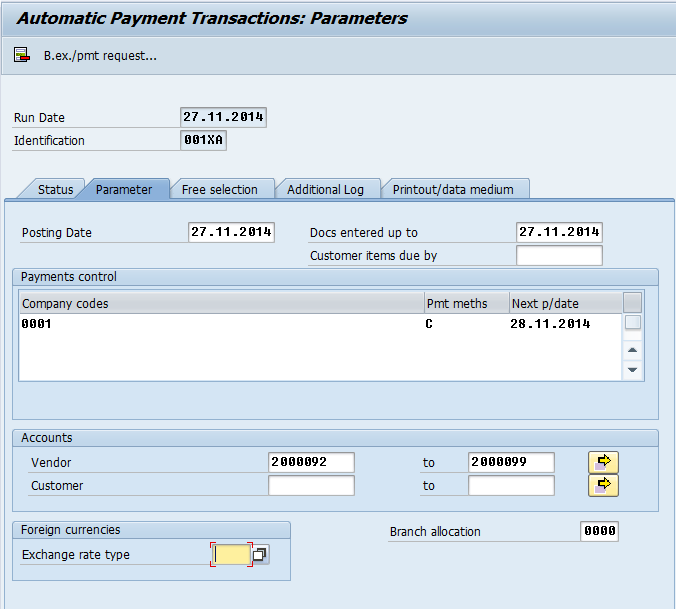
Posting Date - Posting Date of Payment Document
Docs Entered up to - The date up to (Entry Date basis) which open items are taken into account during processing.
Company Code – Enter a list of company code that you need to do an outgoing payment. SAP allows you to enter many company codes in following pattern; eg., 0001,0002,0004,(0005,0010)
Payment Method – Enter the required payment methods without any extra separators between the letters; eg., enter “C” for cheque only or enter “CT” for cheque and transfer.
Next payment date - This date is needed in order to check the due date of payables.
Vendor – Specific vendor code
Customer – Specific Customer Code
Exchange Rate Type – Exchange rate of payment document. (If invoice currency and payment currency are different, you can specify exchange rate type in this screen. Otherwise, system will pick up exchange rate type from configuration.
Branch Allocation - Use this key to assign the branch when automatic postings are to be made within a company code.
Tab Free Selection

You can scope detail of selection in this screen such as document number, business area and almost every field that appear in document and master data.
Tab Additional Log

System displays log of processing based on this screen. Normally, we tick “Due Date Check”, Payment Method selection if not successful” and “Line items of the payment documents”.
Account Required – You can scope vendor/customer that need system to display log.
Tab Printout/data medium

define variant name

assign check lot and house bank
assign check form
This step is an optional which use in case of print out check. You have to develop payment medium program and assign program to payment method configuration first (check T-Code: OBVCU). In this screen, you just define variant name and click “maintain variants” to assign check lot and check form.
2. Create Payment Proposal

Press “proposal” to start processing. System selects open-item under your specific criteria.
a. Display Proposal: Menu Edit >> Proposal >> Display Proposal. You can check selected data here.
b. Edit Proposal: Menu Edit >> Proposal >> Edit Proposal. You can remove payment block or even change discount amount from this.
c. Delete Proposal: Menu Edit >> Proposal >> Delete. In case parameter is incorrect, you can delete proposal and go back to change you parameter.
d. Proposal List: Menu Edit >> Proposal >> Proposal List.
3. Payment Run
Press “Payment Run” to execute. System will generate payment document based on proposal that you create in step 2. Press button “Status” until message " Posting orders: XX generated, XX completed" appears.
4. Print Out Payment Media
Press button “Print Out” to print the checks.
Hope this help. If you found any error, please note in comment. I will find out solution and share for everyone.
Label : SAP, SAP Automatic Payment, SAP F110, F110, SAP Payment, SAP FI, SAP FI-AP